DDT Home Pros

Interior Remodel

Uncategorized

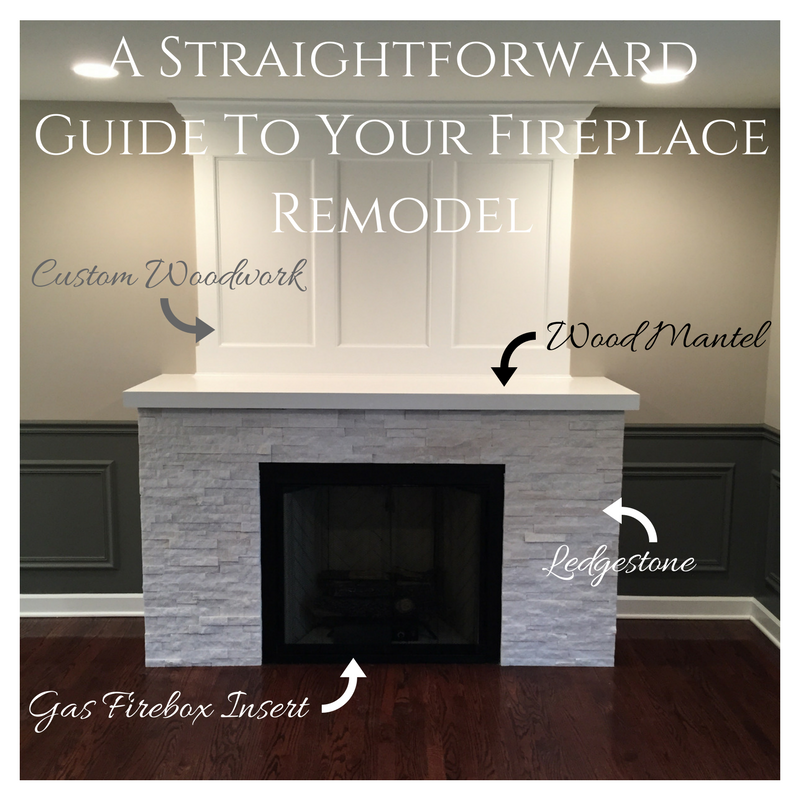
A Straightforward Guide to Your Fireplace Remodel

In today’s market, manufacturers are producing materials that perform better. For example, the standard window is filled with argon gas between two panes of glazed glass. This type of process results in a low-e window, which, essentially, keeps the cold weather out during the winter and the hot weather out during the summer. Other types of material that perform better include insulation and furnaces. If you combine all 3 together, you eliminate the need for a fireplace for the purpose of warmth. The truth is that outside of older homes, fireplaces are primarily used for ambiance and decor. However, a well-designed, custom-built, fireplace can not only be an addition to a room’s design, but a fireplace can be the focal point of the room. In this article, I will talk about steps for planning your custom fireplace. Disclaimer: This is not a how-to article. I assume that a professional tradesman will complete the installation of the firebox. This article provides helpful tips to assist the homeowner with planing for, and what to expect from, a custom fireplace project. What’s Included? For any successful home improvement project to be a success (redundant, I know) requires planning – good planning. Just like a chef wouldn’t start cooking without all of the ingredients, neither would a tradesman start a project without all of the material. Here are the items that go into building a custom fireplace. Vent-Free Gas Firebox Insert The firebox is exactly what it sounds like – it is a box that holds the fire. There are 2 options for a type of firebox insert: vent and vent-free. Vent fireboxes are like a traditional fireplace, which requires a chimney to vent fumes. Vent-free fireboxes use indoor air for combustion, so chimneys, or venting to outside of the home, are not required. Vent-free, gas-powered (natural or propane) is one of the required components to start building your custom fireplace. You can purchase a gas firebox insert from Home Depot for $300-$600. Ledgestone Ledgestone is engineered tile, assembled together to resemble a natural look. The typical size is 6″ (high) x 12″ (long). And, the stone is sold in square foot sections, which is two pieces. Pricing ranges from $4.00 to $8.00 per square foot. You will need mortar and grout to install this tile on the wall, surrounding the firebox. The tile total costs will be between $200-$400. Wood Boards The wood boards, when attached together, will form the fireplace mantel. You will need to purchase the below materials: The total costs will be between $60-$100. How Is It Put Together? The total time for construction depends on the number of people, the experience (or familiarity) with a fireplace project, and how much detail is included in the project. If you are installing ledgestone tiles above the mantel instead of custom wood paneling, then you will save your contractor a couple of steps and a day of work. But, you can expect the project to take 2-4 days to complete. The first day will consist of demo and installation of the gas supply line and electrical outlet, if not already available. The contractor will also complete framing on day one. The second day will include assembling the mantel (including staining), installing the drywall, and installing the firebox. The third day will include installation of the mantel and installation of the tile. After a long day of work, the contractor will be done with the project. How Much Will It Cost? You can expect the total project to cost between $3,000-$4,000. Would you like a free, in-home consultation and estimate for your fireplace remodel? Call DDT Home Transformations at (630) 200-3945 or send an email to sales.ddthomepros@gmail.com to schedule your appointment today. #fireplaceremodel #fireplace #remodel #renovation #familyroom

Uncategorized

Fall Kitchen Remodel Means Holiday Dream Kitchen!

It’s time to start planning your Fall Kitchen Remodel! Big projects take time! Here are 8 things that require time in a kitchen remodel project! Cabinet Delivery: Lead times for cabinets vary from none at all if you can work with the stock cabinetry at your local home improvement store, 4-6 weeks for semi-custom cabinetry from a cabinet dealer, or 6-8 weeks or longer if you work with a custom cabinet builder. Demolition: If the kitchen is being completely remodeled, everything comes out! Demolition can be time consuming. Kitchen cabinetry is broken down if it’s not in good enough shape to be reused or donated. Flooring, especially tile, is labor intensive to take out. If you’re changing your lighting plan, either adding to it, or re-arranging, then drywall may need to be removed. You may decide to remove soffits, walls, or partitions to make the space larger and more efficient which also adds to the time needed for demolition. Concealed Damage: The demolition phase of the kitchen remodel project is usually where any concealed damage is found and addressed which can prolong your project depending on the extend of the work that needs to be added. Undetected water leaks can cause damage to your subfloor, requiring removal of the plywood and replacement with new. Carpentry / Drywall / Electrical Work: Changing your kitchen layout can require some specific trade work such as building new walls or half-walls, installing new drywall where soffits were removed or around a new lighting layout, or running new electrical for under / over-cabinet lighting. If you’re adding an island, code requires an electrical outlet be added to the island in many areas. All of these projects within the kitchen remodel project as a whole require multi-step processes and add time to the amount of time your kitchen is under construction. Flooring Installation: Wood and tile flooring should be installed wall to wall before the cabinetry can be installed. This is to ensure that appliances fit correctly into the space allocated for them and that they can be removed without damage to the surrounding cabinetry, countertops or flooring should they need to be repaired or replaced. Cabinet Installation: Installing cabinets correctly means making sure that they are level, plumb, and square without racking the cabinet boxes and destroying the integrity of the cabinet and voiding your warranties. Shims are used to bring base cabinets level at the highest point of the floor and also to make sure cabinets are vertically straight. Houses settle and perfectly level floors and plumb, square walls are virtually non-existent in homes that have settled over time. Taking the time to correctly install the cabinets ensures that the moldings, countertops, and backsplash tiles can be installed correctly and efficiently. Countertop Installation: Countertops can add several weeks to your kitchen remodel project, depending on what material you choose and where you purchase from. Laminate countertops can be purchased in stock from your local home improvement store, but colors and sizes are limited. If you need a “U-Shape” countertop or an island countertop, they’ll have to be special ordered and can take 1-4 weeks. Granite and quartz countertops must be field measured or templated by the fabricator before they can be cut, which requires that the base cabinets be installed prior to scheduling the measure. Stone countertops can usually be installed 1-4 weeks from the time of the template. Backsplash Tile Installation and Appliance hook-up: Backsplash installation usually takes up the last few days of a kitchen remodel. The tile must be cut and adhered to the wall and allowed to set for a day before it can be grouted and cleaned. Once finished, finish items such as outlet covers can be installed and the faucet and appliances hooked up. Check out our site for some great examples, then set up your free estimate! https://www.ddthomepros.com/contact/ – or just phone 630-200-3945 to schedule! #kitchenremodel #kitchen #renovation #remodel #cabinetry #holidaykitchen #holidays #homeimprovement

Uncategorized

7 Reasons Homeowners Choose DDT Home Transformations to Remodel Their Kitchen

Free Estimates! – Our Interior Designer and Project Manager will meet with you at your home to go over your project with you, make suggestions, and take measurements. She will then provide a 3D perspective rendering of what your new kitchen will look like along with separate cabinet and labor estimates. We have cabinet door displays in our office and color ships to look at in your home and we’re happy to order door samples at your request! Dedicated Interior Designer! – Interior Designer, Nicole Vargas, obtained her AAS degree from Joliet Junior College’s National Kitchen & Bath Association accredited Interior Design Program. She graduated with High Honors and has over 13 years’ experience in kitchen remodeling! Nicole is one of the Owner Partners at DDT Home Transformations and is committed to creating beautiful, functional kitchens for our clients! Buy Your Cabinets Directly From Us! – DDT Home Transformations is an authorized dealer for Decora Cabinets, Kemper Cabinets (including Emerge, Choice, & Echo), and Kitchen Craft! Whether you plan to hire us to install for you or install them yourself, we’re happy to help you plan your cabinet layout and make sure you have everything you need to complete your project! All of the cabinets that we sell include a limited lifetime warranty from the manufacturer. Save Money using Our Relationships! – DDT Home Transformations has formed relationships with countertop and appliance vendors among others and we’re happy to pass our discounts on to you when you choose us to remodel your kitchen! We Coordinate Everything for You! – Let us handle all of the details! From demolition, to delivery of your cabinets, and installation of finishing touches, we’ll be there every step of the way to make sure your project goes as smoothly as possible! Communication is very important to us and we want you to be informed of everything that is happening during your renovation! Fully Licensed, Bonded & Insured! – Rest easy knowing that your kitchen project is in good hands! We’ll pull any necessary permits and pass all inspections! We’re happy to provide a certificate of insurance upon request. In addition to being a registered contractor in all of the local villages, we also carry an electrical license to provide the complete package! Our workmanship is warrantied for 2 years from completion of your project. Support Small Business! – DDT Home Transformations is locally owned and operated serving Plainfield, Naperville and surrounding area! We take pride in our work and are happy to provide kitchen remodeling and other home improvement services to our friends and neighbors who we’ll likely bump into at the grocery store or at our kids’ sporting events! Check out our site to see some of our prvious work, then set up your free estimate! https://www.ddthomepros.com/contact/ – or just phone 630-200-3945 to schedule! #plainfield #naperville #chicagoland #contractor #remodel #renovation #kitchen #kitchendesign

Uncategorized

10 Big Lessons Learned During Kitchen Remodels by a Kitchen Designer

If you look around the kitchen of your older home and it feels small, not at all like the kitchens being built in newer model houses… If your cabinets butt up to a soffit or drop ceiling and there’s a large, rectangular light fixture in the middle of the room… If the cabinet finish is aged to a dark orange or brown grainy oak and your drawer boxes aren’t sliding the way they should… It may be time to start planning your kitchen remodel! Here are 10 lessons our clients have learned during their remodels that they wish they’d known before they started! Save Money by Planning Ahead! – Most contractors will offer full services that will get your project from start to finish. If you want to save a bit of money by doing any of the work yourself, plan ahead. Demolition takes time. DDT Home Transformations is a cabinet dealer as well as an installer, so scheduling the start of your project is a breeze. As soon as the cabinets are ordered, we are provided with an estimated ship date from the manufacturer, so we have a very good idea of when to expect your cabinets. This allows us to either schedule your demolition for you, or if you plan to tackle that part of the project yourself, you’ll know how long you have to get it done! Set a Realistic Budget! – The National Kitchen & Bath Association recommends budgeting 15 – 20% of the value of your home for your kitchen remodel. For example, a $250,000 home would have a $37,000 – $50,000 budget. Once you’ve determined the budget, cut it by at least 25%. Set that amount aside to account for unexpected costs. Ultimately, you decide what you’re willing to spend and where you’d like to allocate extra funds (that gorgeous quartz countertop) or make cuts (that amazing floor tile that you found on clearance!). NKBA recommends the following guideline for allocating your budget: Cabinetry & Hardware: 29% Installation: 17% Appliances & Ventilation: 14% Countertops: 10% Flooring: 7% Lighting: 5% Walls & Ceilings: 5% Design Fees: 4% Doors & Windows: 4% Faucets & Plumbing: 4% Other: 1% Hire a Kitchen Designer! – Although there are some fun programs online that allow you to design your own kitchen, it really is best to enlist the help of a professional before you spend thousands of your dollars on your new kitchen! DDT Home Transformations’ Interior Designer, Nicole Vargas, has over 13 years’ experience designing kitchens! She’ll help you maximize your space and provide beautiful 3D renderings so that you can see what your kitchen will look like when it’s complete! Best of all, she’ll take measurements, provide the renderings, and go over your plan with you at no charge! Choose the Right Cabinets! – Depending on your unique situation, there are 3 basic levels of cabinetry to choose from. The highest quality cabinets, and usually the costliest, are custom cabinets. These cabinets are made from premium materials, such as all-plywood construction, with custom sizes, and custom finishes. If you never plan to move from your house and your budget allows, these may be the cabinets for you! Semi-custom cabinets are the most common and have a very large range of quality and price. Research your brands and ask questions to be sure you know what you’re buying. Some brands offer both all-plywood construction as well as basic furniture board. They are available in a wide array of colors and can be customized with organizational items such as trash can pull outs or roll out trays or a hundred other options. Semi-custom cabinets can look custom if done right. Stock cabinets are the cabinets you find on the shelf in your local big-box home improvement store. These are typically very limited in available sizes and finishes and the quality is on the lesser side, including particle board sides and stapled drawer boxes. These are great for rental properties, first homes, or if you’re looking to put your home on the market with a new kitchen and as little investment as possible. Spring for the Upgrades! – The LAST thing you want to be thinking when your kitchen remodel project is complete is, “I wish I would have…” It’s better to save a bit longer and get all of the things that you wanted, than to rush a project and have it not turn out the way you dreamed. Get the roll trays, the trash can pull out, the deep pot and pan drawers, the fancy tiered cutlery divider drawer… Don’t get regrets. Choose Quality Countertops! – There are so many countertop options available. Choose one that works for you! Granite countertops are timeless, but more and more are being passed up for more modern looking quartz. Quartz will cost more, but requires little to no maintenance and holds up very well. Laminate and acrylic tops are also available, but don’t have the same longevity as stone. Don’t Underestimate the Impact of a Backsplash! – Your backsplash can be a blingy “wow-factor”, tie in your color scheme, or blend in for a clean look. From intricate mosaics, to subway, to large print cement tiles, your backsplash can be the highlight of your new kitchen! Accent it with under-cabinet lighting to make it pop! Just make sure to take some time to research different looks to see what you’d like to have before settling on the latest trend. Kitchen Projects are Messy and Take Time! – Average kitchen projects take anywhere from 3 – 6 weeks. There is no way around it… your kitchen project will be dusty and you’ll be tired of all of your favorite take-out places before it’s over. If you happen to plan your remodel for a time of the year when the weather allows for grilling, that will help with dinner options. Hiring a cleaning service for when it’s all over may help alleviate the task of dusting the house when it’s over as

Uncategorized

Kitchen Design Trends to Look for in 2020

MODERN FARMHOUSE KITCHEN: Elegance made comfortable and transitional to complement the style of your home. Soft creams and greys, warm finishes and subtle accents keep this look fresh. A custom island really completes the look! OFF WHITE CASUAL KITCHEN CABINETS: As the design industry moves away from stark white shaker style cabinets, people continue to be drawn to the clean, bright look they present. Choosing an off white from cool grey to warm cream still brings the timelessness of white without the now dated sterility of absolute white. Contrast with warm wood toned flooring and modern stainless appliances. MAPLE KITCHEN CABINETS: Gone are the days of natural maple as it has aged to bright yellows and mellow golds. Maple is available in a mix of complementary finishes to create striking contrasts and soft complements to meet the design needs of any homeowner. Mix painted maple finishes with soft stained finishes that show the subtle wood grain to create the look you want. Pair with stainless fixtures and appliances for a transitional look or add black hardware and light fixtures for a rustic or traditional appeal. BOLD COLOR POPS: Mixing traditional finishes with bold pops of color create interest in a transitional kitchen. Islands continue to be the go-to piece for adding a snap of color. Shades of blue continue to top the trending choices for bold colors, but don’t let that stop you from adding your own personality to your kitchen design! Many cabinet brands offer custom options to get just the right color for your kitchen! CHERRY WOOD CABINETS: Cherry wood cabinets are timeless and beautiful as always. Mix with lighter or darker contrasting shades to showcase your individual style. Your door style selection also helps to determine your kitchen’s overall look. Create an elegant space by selecting mitered doors with lots of detail or keep it casual with recessed paneled doors. Cherry is available in many shades from traditional reds to more modern grey-browns. No matter which hue you choose, the grain will show through beautifully and the finish will only get richer with age. LARGE KITCHEN ISLANDS: Rather than have a separate formal dining room, many homeowners are opting for a larger kitchen with a substantial island with seating for the whole family. Remodelers looking to acquire this look may also look forward to planning some major renovating to remove partition walls to make room. Definitely work with an experienced contractor before attempting to knock down walls in your own home to be sure that they’re not load bearing! BLACK ACCENTS: Matte black accents are trending for 2020! Whether you decide to feature a black island as a bold statement piece or keep it simple by updating with black cabinet door and drawer hardware and light fixtures, black is the finish to make your kitchen pop in 2020. It can also be used as a stark contrast to a new splash of bold color! Check out our site to see some of our previous work, then set up your free estimate! https://www.ddthomepros.com/contact/ – or just phone 630-200-3945 to schedule! #kitchendesign #kitchentrends #cabinetry #renovation #homeimprovement #remodeling

Uncategorized

Pros & Cons of 5 Kitchen Backsplash Options Trending in 2020

Choosing a backsplash for your kitchen is as important as any other aspect of your overall design. Backsplash tile can be a focal point to draw the eye or a backdrop to feature accent pieces. Here are 5 trending backsplash options for 2020 and pros and cons for each of them. 1. Ceiling Height Backsplashes: Pro: Taking your backsplash to the ceiling in areas where wall cabinets do not impede, such as near windows, behind open shelving, or behind a decorative range hood can add texture, interest, and modernity to your kitchen. If you’ve chosen a larger scale patterned tile, this allows for more surface area for the pattern to develop and be noticed. Con: Not every kitchen has ample wall space available for it to make sense to take backsplash tile to the ceiling. If you’ve only got a couple of inches on either side of a window on one wall to take advantage of, it may just be best to curb the backsplash at the standard 18” height that is typically where the wall cabinets start. This is especially true if you’ve selected a large patterned backsplash tile. With so little room, the pattern is lost to the scrap pile at the tile saw. There is also one very clear negative about ceiling height backsplash tile in a kitchen with abundant wall space. Budget. Depending on the backsplash tile you choose, additional square footage can add up quickly in both materials and labor. 2. Larger Subway Tiles: Pro: Larger subway tiles allow for a few more installation options than the standard 3” x 6” tile that has been popular for years now. Rather than installing in a typical horizontal brick pattern splitting the seams halfway through the tile below, you could opt to split the rows by thirds, install in a herringbone pattern, or completely vertically! A quick internet search of subway tile designs will provide an endless selection of patterns to choose from! The larger tiles help keep the subway style tiles fresh and trendy. Con: Subway tile can be standard and boring. Subway tiles are so popular that they’re the first option for many home remodelers. Keep your kitchen from looking like every other kitchen in your neighborhood by choosing a subway tile with some personality. Choose a bold color or pattern to make your subway tile pop! 3. Mirrored & Metallic Finish Backsplash Tiles: Pro: Mirrored or metallic finished backsplash tiles reflect light and make your kitchen appear brighter. Larger metallic tiles make an easy dramatic statement while smaller tiles can add the same wow factor when selected in interesting patterns. Con: Mirrored and metallic tiles are not easy to install. Professional installation is recommended not only because metal tiles can be difficult to cut on a less-than-professional tile saw without chipping or bending, but because they need to be installed on as even a plane as possible. When metallic tiles are uneven on a wall, the imperfections become very obvious due to light reflection. A professional installer will have more experience leveling the tiles on the vertical plane to minimize these imperfections and, where possible, hide variances in the wall itself. 4. Patterns: Pro: The trend away from granite countertops to more subtle quartz countertops invites the opportunity to move to more patterned backsplash tiles. Whether the pattern is in the tile itself or the way the tile is installed, simpler quartz patterns don’t clash with backsplash tiles the way that busier granite can. Cons: Patterned tiles are a decision that requires being sure you’re still going to love the pattern you’ve chosen 5 years after your kitchen project is complete! Choose something that makes sense in your house. A backsplash project isn’t something anyone wants to take on every couple of years. 5. Bold Colors: Pro: Bold colored kitchen backsplashes are featured in all of the top kitchen remodeling magazines for 2020’s biggest trends! Set a mood with your kitchen remodel by incorporating certain elements into your backsplash. Use black or grey to convey modern luxury. Oranges, pinks, and reds invoke energy and happiness. Blues and greens add feelings of peace and calm. Con: Choosing a bold colored backsplash is a huge commitment. It’s easy to change paint colors, but installing tile can be much more permanent. A gallon of paint will cost far less than a new backsplash should you tire of your color selection. If you’re not decisively committed and confident in your backsplash color selection, another option would be to use painted walls and accent pieces such as vases and wall décor to add color to your kitchen. Check out our site to see some of our previous work, then set up your free estimate! https://www.ddthomepros.com/contact/ – or just phone 630-200-3945 to schedule! 

Uncategorized

Get a “Cabinets Only” Price Quote for Your Next DIY or Contractor Kitchen Remodel

Are you a talented DIYer or Contractor? Or perhaps you have a carpenter in the family who will install for beer and pizza? You can order cabinetry from a cabinet dealer without installation and sometimes you’ll even get a discount since the dealer won’t need to manage your project! Here are the items that you will need to provide to the Kitchen Designer to get a cabinet quote without an in-home estimate! In order to receive a rendering and estimate from DDT Home Transformations, you’ll need to select a door style and color for your cabinetry. A good place to start is ddthometransformations.kempercabinets.com Email your selection and measurements to contact@ddthometransformations.com for your free rendering and cabinet-only price quote!

Uncategorized

10 Great Materials for your Beautiful New Countertop

Quartz: “Quartz” countertops are actually an engineered stone product generally consisting of up to 93” quartz particles and 7% acrylics, fillers, and resins. Engineered stone is slightly less glossy than granite, but can bring the same upscale look and it doesn’t require sealing. The same process used to create quartz countertops is also being used to create recycled glass countertops, which can be very pricey. Granite: Natural stone remains a timeless option for kitchen countertops. Natural stone goes with anything and makes any kitchen seem luxurious. Granite does require a bit of maintenance as it needs periodic sealing to prevent staining and moisture absorption, but the only thing difficult about sealing your granite is remembering to do it! The cost of granite countertops has fallen quite a bit in recent years to be more competitive with the increasing popularity of engineered stone countertops. Soapstone: Another natural stone, soapstone is usually dark gray to green or bluish in color with a soft feel. The stone does age or “patina” over time and is prone to scratching which is considered to add to its charm. It’s often seen in historic homes but is also used in more modern kitchens. Soapstone is maintained with mineral oil. Marble: Yet another natural stone that is seeing a resurgence going into 2020 is marble. The large veining is very popular in today’s kitchen designs. Marble can be very expensive and requires regular upkeep. Marble is softer and more porous than granite, but newer sealers can help reduce the amount of maintenance required. Many kitchen designers opt to recommend an engineered stone with veining to mimic the look of marble. Solid Surface: Acrylic countertops, such as Dupont’s Corian, have been around for several decades and have lost ground in popularity as other materials offer more benefits for similar cost. Solid surface, although non-porous, scratches rather easily and has more “plastic” feel than stone. Solid surface can also be easily damaged by hot pans. Ceramic Tile: Ceramic tile countertops are durable and easier to clean than they used to be thanks to more stain-resistant grout. They’re easy for DIYers to construct and the range of color and pattern options is endless. Tiles can be brittle, however, and not immune to cracks and breaks and they don’t look as classy as stone. Laminate: Laminate countertops, such as Formica or Wilsonart, are essentially plastic-coated layers of paper pattern on a particleboard (MDF) substrate. They can be purchased made-to-size as special order in thousands of color / pattern options or purchased pre-fabricated to be cut-to-size on site from your local home store. This is a very inexpensive option and may be viewed as low-end should you try to sell your home with laminate countertops installed. The seams are always visible and damage is practically impossible to repair. Wood or Butcher Block: Available in a range of wood species, colors, and finishes, wood or butcher block countertops add warmth to modern kitchens. They can be sanded and resealed as necessary and last a very long time if cared for properly. They can be expensive and easily damaged by knives. If not properly maintained, bacteria can be a problem, as well as cracking if the wood is not oiled and sealed often. Stainless Steel: Modern style kitchens often showcase stainless steel countertops. They are impervious to heat damage and are regarded as a “premium” option. Of all the countertop materials available, this is said to be the easiest to clean. However, it is expensive to fabricate, noisy, and can be easily scratched. Concrete: Great for countertops in interesting shapes or if you want something completely unique, concrete countertops can be color tinted, acid-stained, and made to look exotic and unusual. They are custom made, so can be very expensive. They are generally polished, so they don’t appear like the concrete used to make sidewalks, but they are still porous and require sealing. Cracking may occur over time. Check out our site to see some of our previous work, then set up your free estimate! https://www.ddthomepros.com/contact/ – or just phone 630-200-3945 to schedule!

Scroll to Top